There is no doubt that testing interactions between services plays a key role from a business process perspective.
Bi-directional contract testing in practice
Code
16
.
01
.
2024
Bartek Krakowski

Let's outline an example: we integrated correctly with an external service and tested this communication by simulating the expected response from the API. Everything seems to work: the tests go green, and our service performs its task accordingly, based on the expected response. How can we know that significant changes have been made on the other side in the meantime?
Theoretically, we can accomplish this with end-to-end tests, but they have their limitations:
Complexity of configuration
E2E testing often requires a more complex setup because it must address different scenarios and test conditions in a full production environment. This leads to more test preparation work, as well as more possible points of failure in the test setup.
Instability
E2E testing is more susceptible to errors known as "flaky testing", which does not always produce repeatable results. This can lead to situations where tests produce misleading error messages, complicating problem identification.
Difficulty isolating problems
Because E2E testing tests the entire path from the front-end to the back-end, it can be difficult to identify which service or part of the system is responsible for the problem.
Contract testing is a valuable alternative that eliminates some of these challenges. It focuses on a specific interaction between services, is more stable and less likely to generate random errors, and allows for more precise identification of problems. While implementing contract tests may require an initial amount of work, they save time and money in the long run by eliminating errors early in the project.
What is Contract Testing?
Contract testing is used to test the interactions between different services. A "contract" is an agreement that defines what interactions should take place between two services. For example, a contract may specify what data should be transferred from the back-end to the front-end and how that data should be formatted. Contract testing ensures that both parties follow the established rules. This helps detect communication issues between systems early in the development process, making them easier to resolve and preventing potential errors in the future.
To begin with, it is worth explaining the key concepts necessary to understand the rest of the article:
- Pact – a tool that enables developers to define and manage contract tests. It allows you to create contracts that precisely describe how the interaction between various services should take place.
- Pact broker – central contract repository. It plays a key role in the contract test management process by enabling the storage, sharing, monitoring, and versioning of contracts between consumers and service providers. It is a central place that facilitates control and transparency in interactions between services.
- Pactflow – a platform that streamlines the entire contract test management process. Thanks to it, developers can easily store, share, monitor, and version their contracts. This platform also allows you to track the history of changes to contracts
Why is it worth using contract tests?
Before we delve into the technical details, it is worth considering why we should be interested in contract testing at all. If we have unit testing, integration testing, and E2E testing, why do we need other testing methods?
Complex environment
Nowadays, many applications are developed in a microservices architecture. Individual services communicate with each other, exchanging data and using various functionalities. In such an environment, it is very easy to make errors - a change in one service can cause errors in other services that use it.
Rapid software evolution
Due to the constant evolution and development of the software, changes are introduced very often. Any such change, whether a new feature, bug fix, or update, carries the risk of potential incompatibilities or errors in existing code or interfaces. As the project grows and evolves, the number of these changes can increase significantly, making compatibility management more and more challenging.
Benefits of contract testing:
Early detection of non-compliance
Contract testing allows you to detect potential communication problems between services at a very early stage of development. This allows you to respond quickly to these problems and avoid implementation errors.
Flexibility
Teams can develop and deploy their microservices independently with confidence that they won't introduce problems for other teams.
Testing in isolation
Contract testing does not require running the entire complex environment or all associated services to confirm compatibility. This allows teams to isolate and test their changes in a separate environment, which speeds up the testing process and increases its reliability.
Costs
While implementing contract testing may require some upfront work, it can save you time and money in the long run. By eliminating errors at an early stage, we avoid costly repairs in the later phases of the project.
Differences between Consumer Driven Contract Testing (CDCT) and Bi-directional Contract Testing (BDCT)
Bi-directional contract testing (BDCT) is a type of contract testing. BDCT compares two contracts – one setting out the consumer's expectations and the other relating to the provider's capabilities.
In the CDCT approach, the consumer creates a contract and submits it to the pact broker. The provider, in turn, sends it for verification. After verification, the provider informs the pact broker of the results, and both parties - using the can-i-deploy tool - can check whether their updates are compatible. In BDCT, both parties – consumers and providers – create their contracts and send them to the pact broker, who checks their compatibility. This approach provides greater independence, allowing providers to not worry about the specific requirements of each consumer, and allowing consumers to choose providers that meet their expectations.
Currently, bi-directional contract testing is only supported by Pactflow.
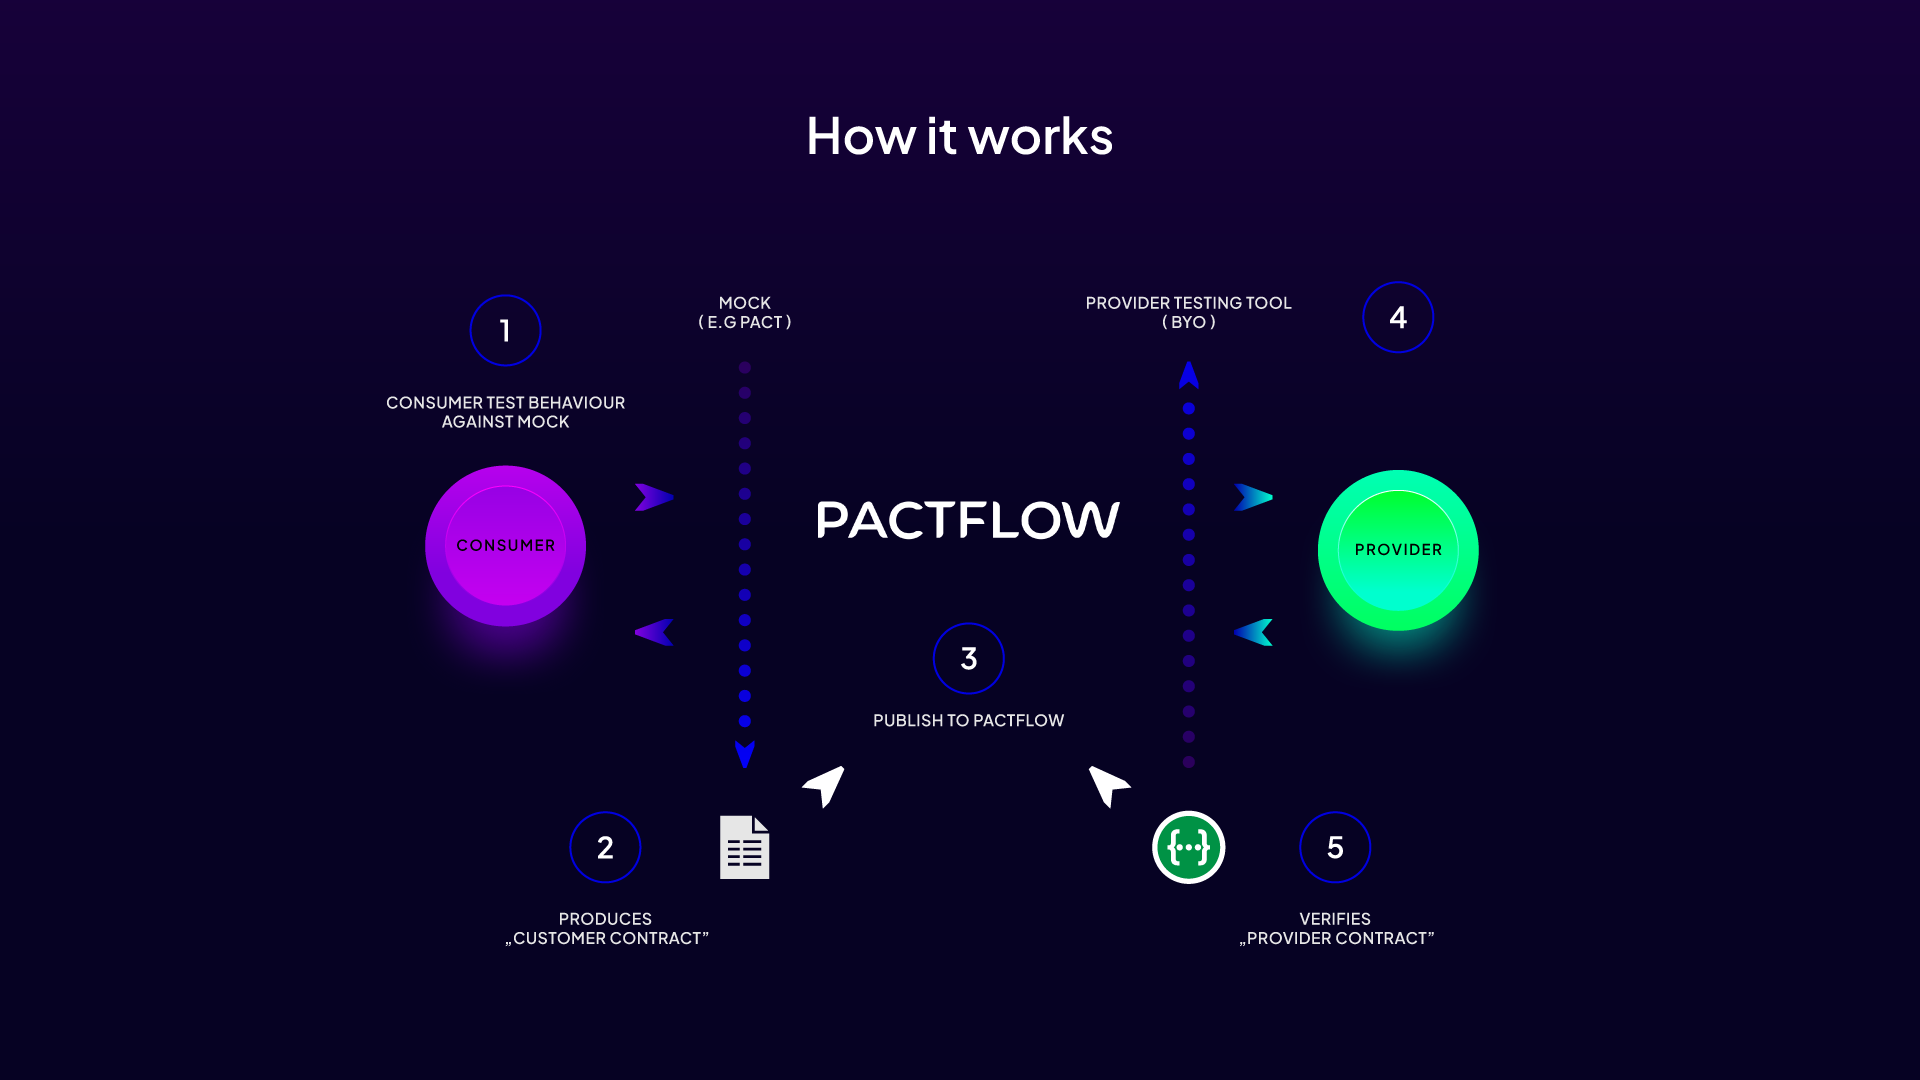
How Does It Work?
he contract verification process takes place in two main stages, focusing on the roles of provider and consumer.
In short, the provider, being the source of functionality or data, prepares specifications describing these functionalities to ensure that they are consistent with the consumer's expectations. Once these specifications are successfully tested and verified, they are transferred to the central repository – pact broker.
On the other hand, a consumer who uses a provider creates unit tests to simulate interactions with the provider. These tests help create contracts that describe exactly what the consumer expects from the provider. Once these contracts are tested, they are also forwarded to the pact broker.
The pact broker plays a key role in this process, constituting the central point of comparison and verification of contracts on both sides. When all elements of the contract are compliant, both parties are immediately informed that the changes are correct and ready to implement.
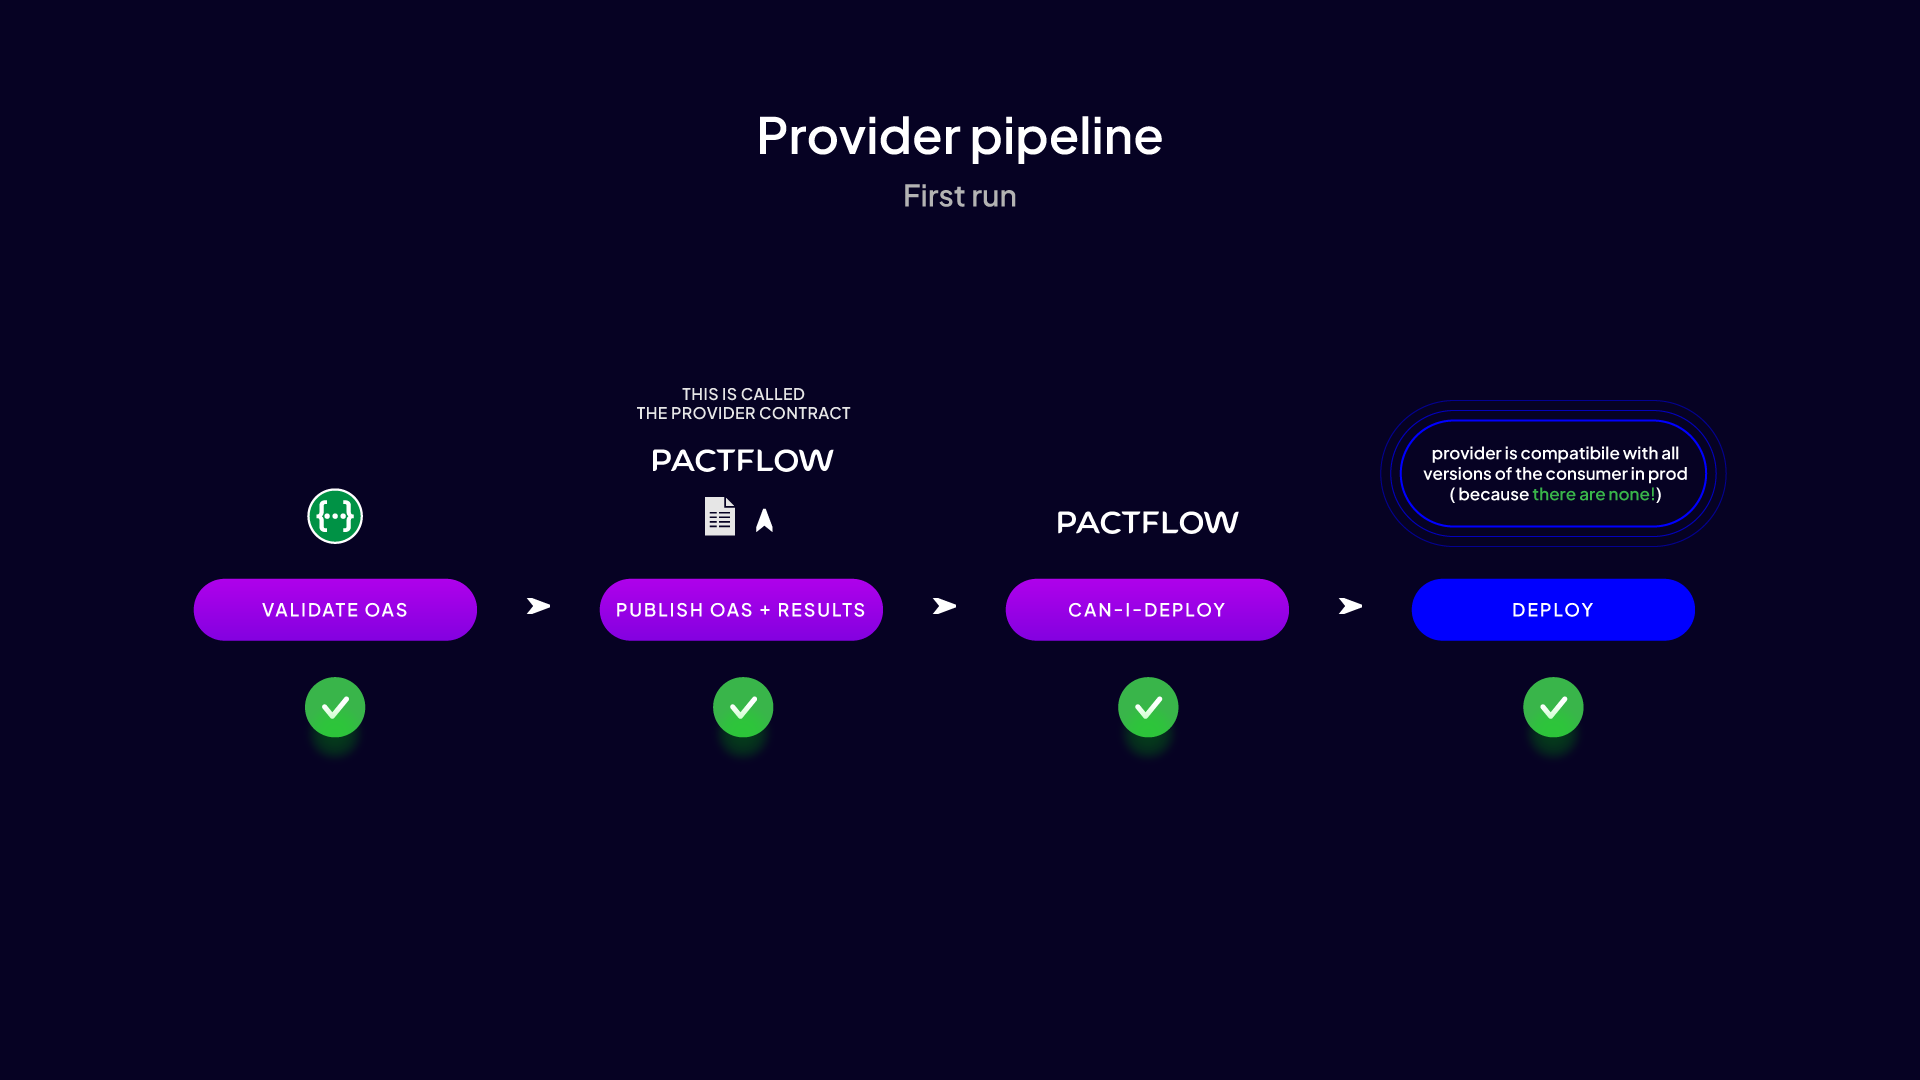
Provider
- Creating unit tests. The provider creates a set of tests that ensure that its services work as expected and meet acceptance criteria.
- Generating specifications. Based on the test results and internal documentation, the provider generates the OpenAPI specification. This is a formal document that describes the provider's API and what features are available to consumers.
- Publishing specifications. The specification is then sent to the pact broker. This is a key step that allows the pact broker to compare the consumer's expectations with the provider's actual capabilities.
- Compliance verification. If the provider's specification is consistent with the consumer's expectations, it is possible to implement a new version of the application.
- Implementation registration. Once deployed successfully, this information is logged in the pact broker. Thanks to this, Pactflow can track which versions of specific websites run in specific environments. This not only provides transparency about the current versions running in different environments but also allows you to precisely determine which versions of the contracts have been satisfied by which versions of the providers. If issues are detected or a release needs to be rolled back, recording your deployments helps you quickly identify potential incompatibilities and take appropriate action.
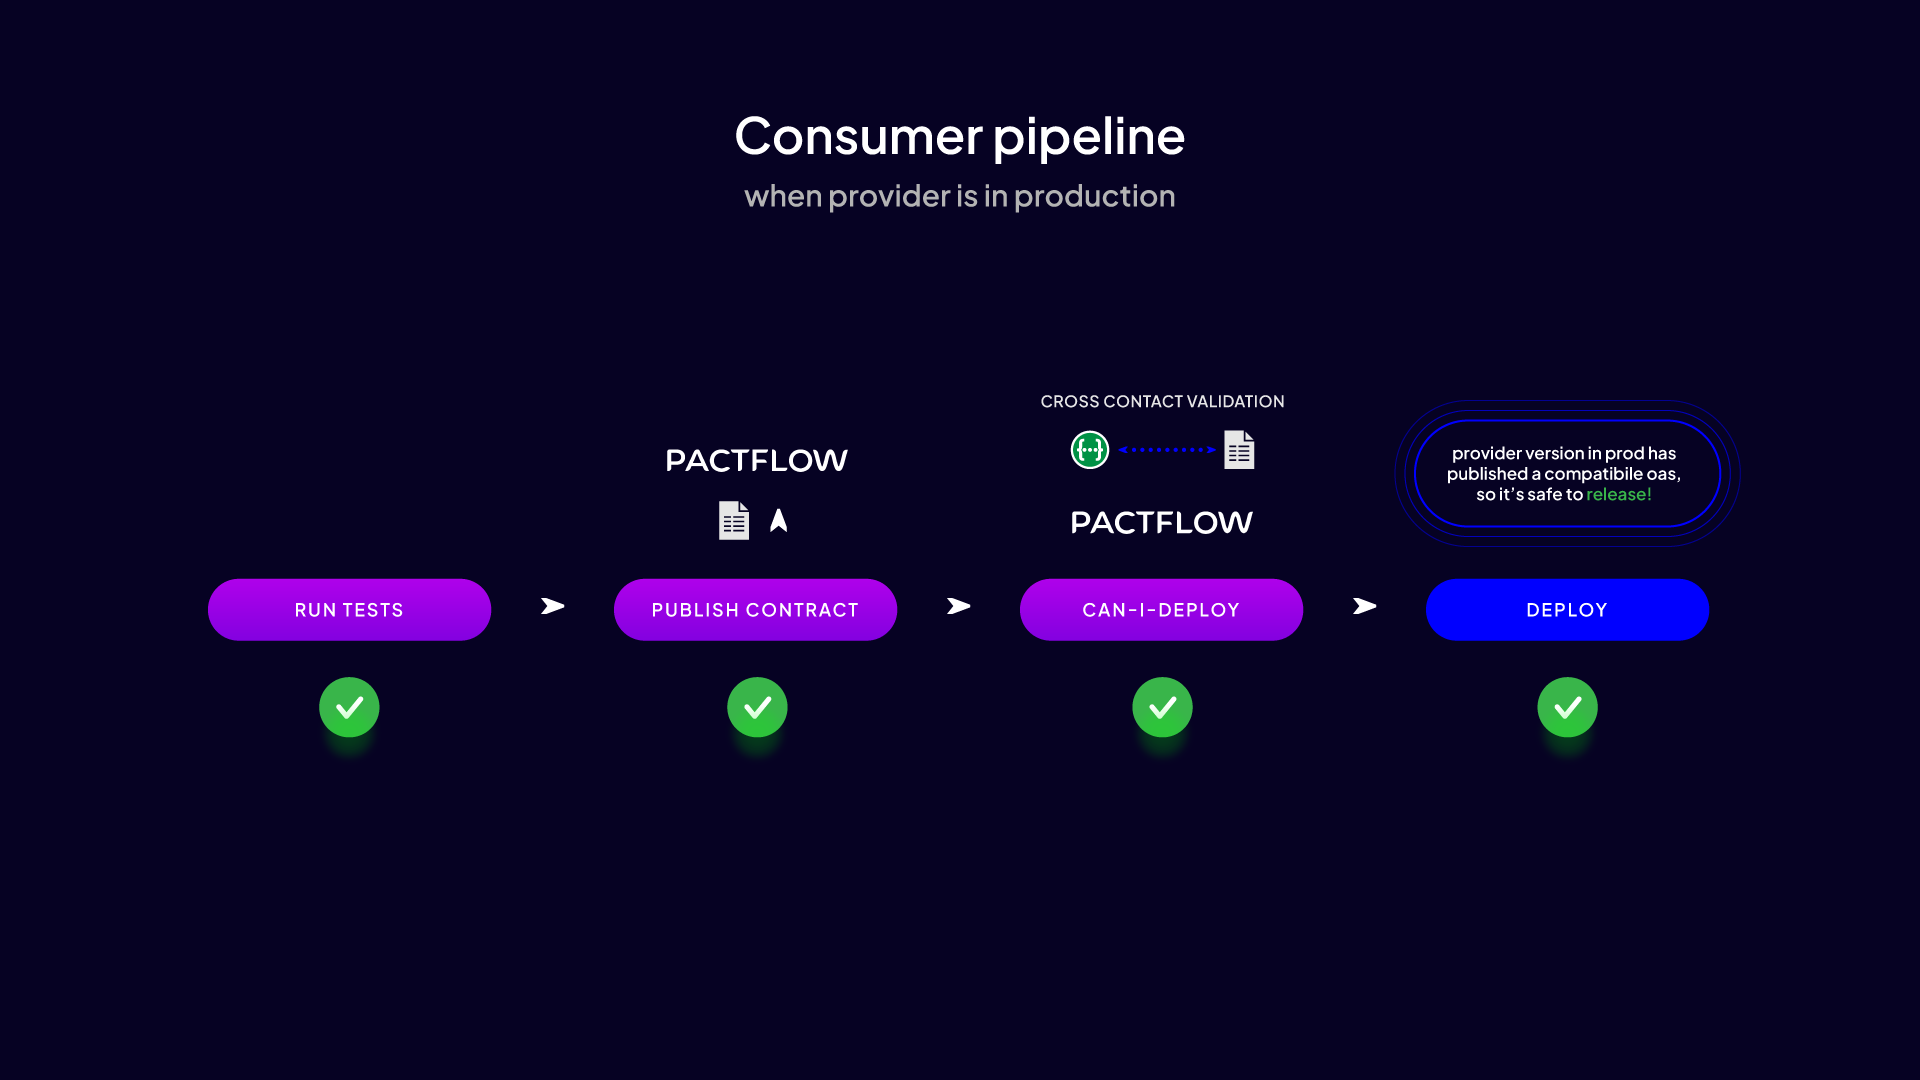
Consumer:
Creating unit tests. Analogous to CDCT, the consumer creates and runs unit tests that simulate interactions with the provider. The goal is to create a precise contract that describes what expectations the consumer has from the provider. For this purpose, we can use the Pact library or another popular tool (e.g. MSW or Wiremock).
- Publishing the contract. Once the contract is ready, it is sent to the pact broker.
- Compliance verification. The pact broker verifies that the consumer's contracts comply with the provider's specifications. If everything is compliant, implementation can be carried out.
- Implementation registration. As with the provider, after successful implementation, information is recorded in the pact broker, ensuring transparency and up-to-date data for all parties.
Practical example of bi-directional contract testing
Understanding the theory is key, but the real power of contract testing comes in its practical application. To help the reader fully understand this process, I will present a specific example of two applications working together and using contract testing.
On the one hand, we have the consumer: an application built based on the NextJS framework. The MSW (Mock Service Worker) tool is used to simulate interactions with the provider, and the Jest library is used for unit tests. The entire contract testing mechanism is based on PactJS combined with the @pactflow/pact-msw-adapter, which allows for smooth integration of MSW with Pact.
On the other hand, we have a provider: a server application based on the Fastify framework. The Zod library is used to define and validate schemas, while documentation and API interactions are handled by @fastify/swagger. The entire testing process of this application is based on the tap tool.
In the next steps, we will go through the process of creating contract tests for both applications, paying attention to key moments and challenges that may arise during implementation. We want to show how both applications can work together while ensuring the quality and consistency of interaction.
In the following, we will show how both of these applications can be tested using contract testing. This example is not intended to cover all possible scenarios, but rather to present a general approach and mechanisms that can be applied to real projects.
Pactflow setup
Pactflow is a contract management platform that not only allows you to store them but also monitors compliance and tracks their history. It will be the central place where we will store our contracts. Before we start working, we need to create an account on this website (pactflow.io) and generate the necessary environment variables:
this is the URL of the workspace that we created when creating an account in Pactflow. This should be a URL like "https://*****.pactflow.io/".
: this token is used to authenticate our project when communicating with the pact broker.
Both of the above values. variables can be found in the settings in the "API Tokens" tab.
Provider
Setup of the Fastify application
The provider is built on top of Fastify, a web framework for Node.js that is highly customizable and supports multiple plugins such as @fastify/swagger for generating API documentation and fastify-zod for input validation.
Main Fastify configuration in the src/app.ts file:
Zod schemas
Zod diagrams are an invaluable tool in the context of contract testing. They are used to validate both input and output data for various API endpoints. In practice, this means that these schemas enable precise control over the format and structure of data that flows between the consumer and the provider. On their basis, an OpenAPI (OAS) file will be generated, which becomes a contract on the provider's side.
Schemas for the users endpoint defined in the `src/routes/users/users.schemas.ts` file:
API endpoints
API endpoints are the heart of our application, allowing communication between the client and the server. They are defined in files located in the src/routes directory. In the example below, we focus on user experience.
Endpoints for user support are defined in the src/routes/users/index.ts file:
Please note that we are using the server.zod.get method provided by the fastify-zod library. We use Zod schemas (userSchemaRequest and userSchemaReply) to validate request and response parameters. These schemas are defined in the users.schemas.ts file.
Unit tests:
To ensure that the provider functions properly, it is necessary to perform tests for specific endpoints. For this purpose, we use the Tap framework.
Test example for users endpoints (tests/routes/users.test.ts):
OpenAPI specification generation (OAS):
In the project, we implemented a script that generates the OpenAPI specification based on the paths and patterns defined in our application. The file in question will act as a contract on the provider's side and will be sent to the pact broker to verify compliance with the consumer's contract.
The generateOas.ts file contains a script that generates the OpenAPI specification and saves it to the swagger.yml file in the oas directory.
Automatic generation of OAS (OpenAPI Specification) documentation in the utils/generateOas.ts file:
Generating OpenAPI specifications is part of the testing process, so we always have up-to-date API documentation that is compatible with the latest version of our application.
This file is run after tests thanks to the configuration in the .taprc file.
Automate OpenAPI documentation updates after testing:
Publishing the contract
Once you have successfully run unit tests and generated the OpenAPI spec, the next step is to publish this contract to Pactflow. This process involves integrating the tool with CI/CD, which enables the automatic publishing of contracts after each successful modification. For this purpose, we use Pactflow CLI, indicating the provider's name, version, and branch, as well as information related to the generated contract: its format, path to the swagger.yml file, data format of the verification result, and information about the tool used to verify the contract with the provider.
Publishing the contract:
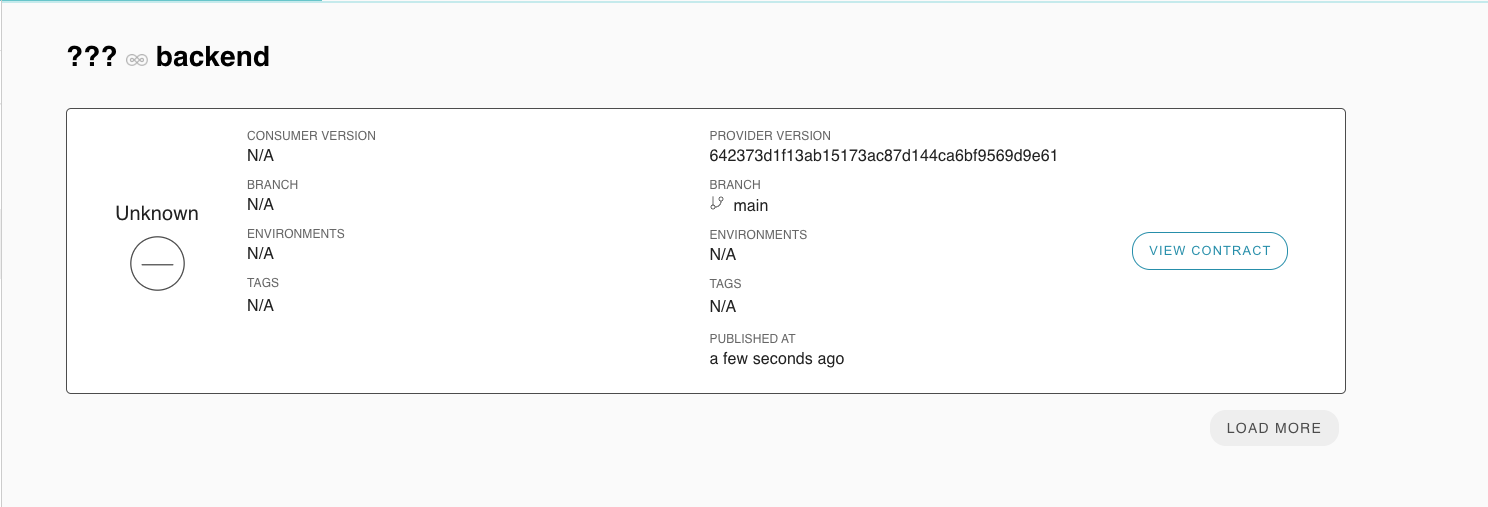
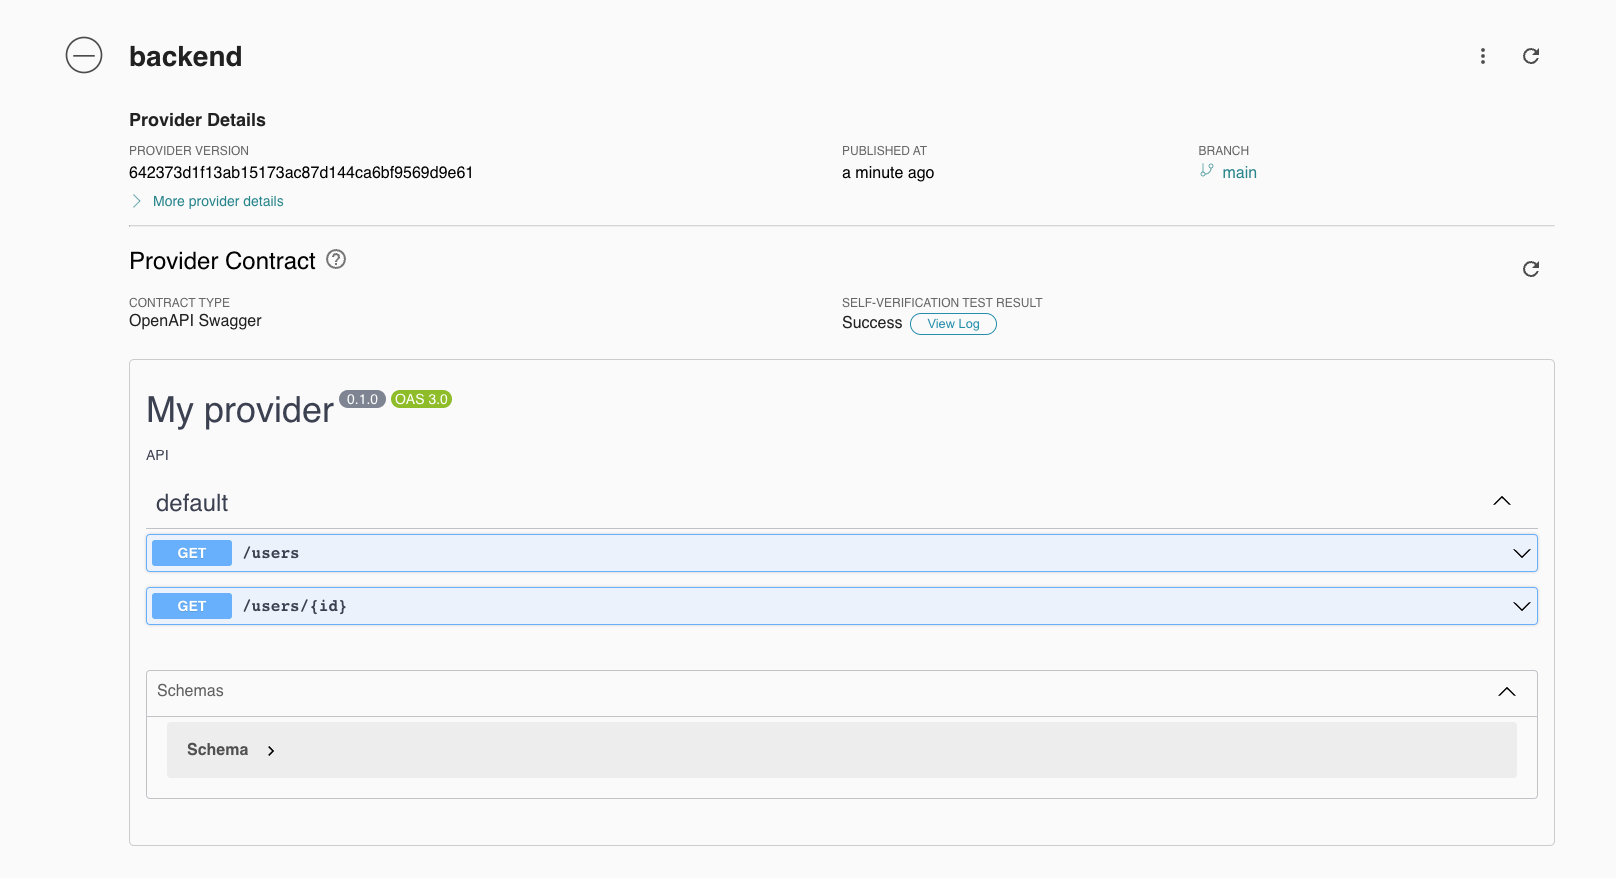
Once a contract is published, it is visible in Pactflow.
As we can see, it contains all the necessary information related to it.
At this stage, the contract has the status "Unverified", which means that it has not been verified by the consumer.
Verification of compliance
Once the contract has been published, the next step is to verify the consistency between the contract and the actual consumer implementation. To do this, we will use the can-i-deploy tool, indicating the provider name, version, and environment. It is worth noting that Pact introduces terminology that uses the word "pacticipant" instead of "participant".
Verification of compliance:
Deployment recording
After successful verification of the contract and successful implementation of the service, an important step is to register this implementation with the pact broker. For this purpose, we use Pactflow CLI, indicating the provider's name, version, and environment.
Deployment recording:
Consumer
MSW (Mock Service Worker) setup:
MSW allows you to simulate network interactions without having to poll servers. This allows the consumer to test how it responds to different types of server responses.
Our setup for the consumer is based on the file that is responsible for the MSW configuration and @pactflow/pact-msw-adapter.
Initializing and managing the mock server using MSW and Pact adapter (utils/setupMockServer.ts):
In the setupMockServer helper, the entire process starts with MSW initialization, where using the setupServer function from MSW, the simulated API is configured using defined handlers. Once this configuration is ready, integration with Pact takes place using the setupPactMswAdapter function. Thanks to this, each simulated interaction is recorded and converted into a contract in the Pact format. When the tests are run, all requests to the simulated API are captured by MSW and logged by the Pact adapter. Finally, after all tests are completed, the adapter processes the recorded interactions and converts them into Pact format contracts, which are then saved to the specified files.
It is worth noting that in the "classic" approach, each integration is represented by 1 test file. In this example, we assume that tests based on one integration are decentralized, therefore each subsequent test would overwrite the already generated pact for previous tests. Therefore, instead of overwriting the old contract file, the mergePactFiles function checks to see if the file already exists and then merges the old interactions with the new ones. Therefore, remember to delete old contracts each time you run tests.
Unit tests:
Now let's move on to an example of a specific test that will help you better understand how contract testing is used in practice. In this case, we will focus on testing the /users subpage to make sure it can properly display the list of users.
Example test using MSW (app/users/__tests__/users.test.tsx):
The most important element from the perspective of this example is the use of the setupMockServer helper with the allUsersHandler handler, which means that each test in this group will use a simulated server and each interaction will be registered in the contract.
Contract publishing
Once the consumer has completed the tests and confirmed that his or her expectations of the provider's interface match reality, the consumer publishes the contract to Pactflow.
Contract publishing:
Once a contract is published, just like with a provider, it is available in Pactflow.
If the contract we publish complies with the provider's specifications, its status changes from "Unverified" to "Verified".
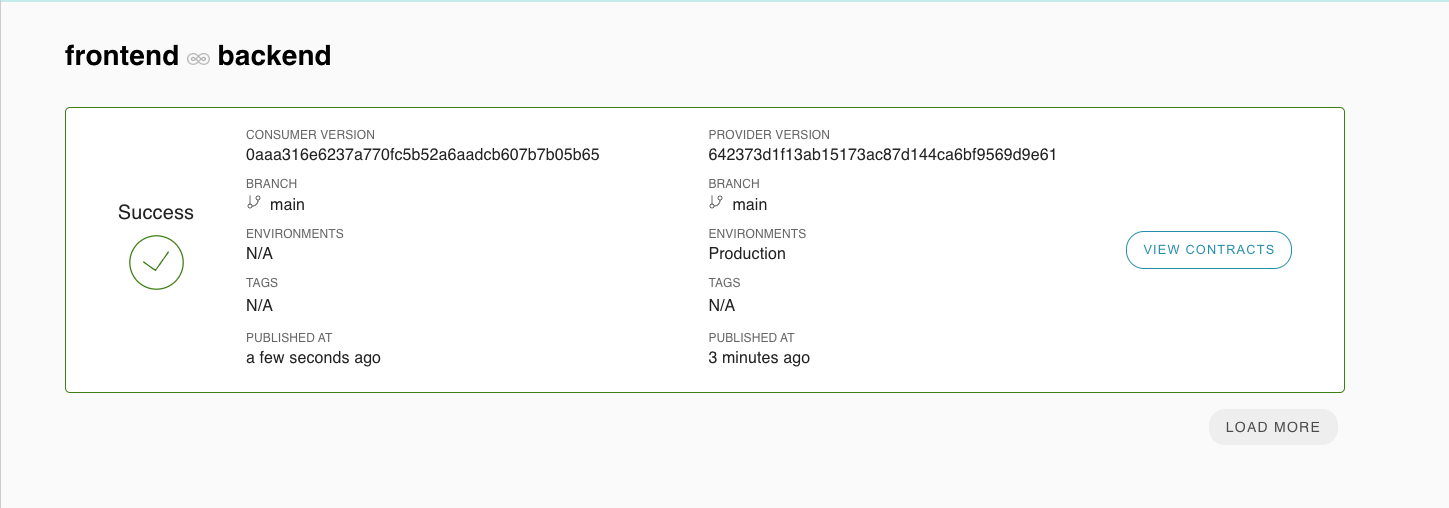
Additionally, after clicking "View contract", the user has access to information about all mocks used. This makes debugging easier in case the contract verification goes wrong.

Compatibility verification
After publishing the contract, we move to an extremely important stage in the contract testing process, namely verifying the compliance of both contracts. This process aims to ensure that changes made on the provider and consumer sides are consistent with the agreed contracts and do not introduce inconsistencies in communication between them. This verification is crucial to ensure consistency of interactions between services and to avoid potential problems when implementing updates or new functionalities.
For this purpose, we use a tool that we have already learned about, namely can-i-deploy. This tool allows us to automatically check whether the implementation of changes is safe and compliant with applicable contracts.
Compatibility verification:
Deployment recording
Registration of the implementation is a key step at the end of the entire process. This is the stage at which we confirm that our application has been successfully implemented and is ready to run. It is worth emphasizing that this is a step analogous to the process performed by the provider. We use Pactflow CLI again, indicating the consumer name, version, and environment.
Deployment recording:
The entire code is available in the repository here
Summary
Nowadays, when the software market is more dynamic than ever before, we cannot afford to make mistakes due to a lack of communication or ambiguities in interfaces. Bidirectional contract testing solves these problems by providing precision, automation, and confidence in the verification process. Their use translates into fewer errors in production, faster release cycles, and, most importantly, a better experience for end users. As a result, this approach is becoming not only a best practice, but a necessity in a development environment striving for excellence.